Feeds:
Posts
Comments

Chiars!

Chia Cookies

My version of http://deliciouslyella.com/chocolate-chia-cookies/ so delicious I had to share.

I didn’t have coconut oil so used our olive oil, I didn’t have enough hazelnuts so made up the shortfall with walnuts, I didn’t have maple syrup so used local honey, I didn’t have dates so used prunes, nor did I have quinoa or buckwheat so used wholewheat flour, however, they were gorgeous.

Chiars Ella !


Having recently returned from a trip to the UK, where I experienced the trend that is Granola, I decided to make it myself.

I found that not only was it better, as all things homemade are, I could adjust to taste, a phrase I’m very fond of.

Toasted delight.

Toasted delight.


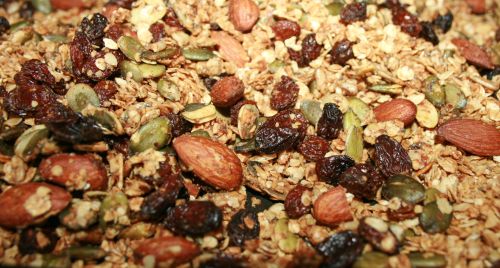
It’s basically toasted rolled oats with the addition of whatever you like.

I took 3 cups of rolled oats and added the following ……

1/4 cup Honey

1/4 cup Olive oil

1/4 cup Whole almonds

1/4 cup Dried Raisins

1/4 cup Pumpkin seeds

1 tbsp Flax seed

1 tsp Cinnamon

1 tsp Vanilla extract

A pinch of salt


Put them all together in a bowl, mix well and then spread out evenly on a baking tray, bake for 15 mins on 160-180c, or until desired golden brown.

If you like your Granola well toasted but your dried fruits still soft, you may want to add your dried fruit mid way through baking as they will get chewy the longer they are in the oven.

You can use any mixture of dried fruits you like, you can use any mixture of seeds or nuts that you like, you can leave them whole or ground them up, whatever you want you can have. You can use brown sugar as well as or instead of honey.

No more grumbling about how you wished your shop bought Granola had bigger pieces of nuts or less raisins blah blah blah

That evening, being unable to wait for breakfast to eat the cause of the delicious smell in my kitchen, I put together a little something for Mr J and I.

I named it YOGRANBERRY…….

YOGRANBERRY


Layer in a glass or bowl or teacup, whatever you have, the following……..

1 tbsp Homemade Granola

1 tbsp Greek Yogurt

1 tbsp Mixed Berries and Banana ( I put defrosted mixed berries into a blender with a banana)

1 tbsp Greek Yogurt

1 tbsp Mixed Berries and Banana

Topped off with more homemade Granola.

If you’d like it sweeter just add honey somewhere along the way.

And remember my favorite phrase and do adjust to taste.


Preserved Lemons

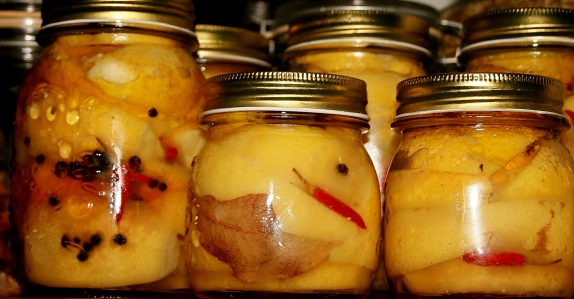
preserved lemons with chillies, bay leaf and peppercornsPreserved lemons are delicious, easy to make and used in many dishes, especially Moroccan and Middle Eastern.

They take 3-4 weeks to cure and yes, you eat the skin.

Our little lemon tree here at Arete has produced the most fruit ever this year and so I’ve decided to make and share these jars of zing with friends and neighbours this Christmas.

Here’s how you can make them………………..

Firstly, sterilize your jars of choice, I put mine in boiling water in a large pan on the log fire for hours and just let them bubble.

You will need some ripe and unblemished lemons, as a general rule 3-4 medium lemons will squeeze into an average size jam jar.

Wash and dry the lemons, cut them lengthwise into quarters and rub each quarter with plenty of sea salt, or any salt you have.

Place a few pieces in the bottom of the jar, squeeze them down hard and sprinkle on some more salt, then continue with another few pieces all the time adding any additional flavours you may fancy.

You can see in the picture above I added dried birds eye chilies, bay leaves and peppercorns.

When the jar is full and lemons are well packed in, add enough lemon juice to cover them completely, pop the lid on and agitate, turn upside down and shake about a bit making sure the lemon juice has got into every gap.

Let settle upright, unscrew the lid and just make sure with one last press down that the lemons are still covered with the juice, if not add more juice until they are. I also pour in a little olive oil to seal the top, optional.

Put the jars in a place of honour, out of direct sunlight in your kitchen, they look really lovely, why not show them off.

Wait at least 3 weeks, 4 is better, the longer you leave them the better they taste and then make something.

Scoop out and discard the soft flesh  and use the peel, chopped, sliced or whole, it’s best added towards the end of cooking time for a salty, aromatic, zingy complement to your dish.

The lemons are ideal for slow cooked casseroles and stews, salads and rice dishes, there is no end to their versatility and they will keep for months in the fridge once opened.

As soon as mine are ready I will be making a Lamb Tagine, with classic Moroccan flavours of ginger, saffron and my very own homemade preserved lemons.

Can’t wait!

Caretta Caretta

Sunrise.

The most important visitor to Crete will arrive in May, she’s already on her way.

Her name is “Caretta Caretta“, she has become entwined in our lives in such a way as we could never have imagined.

May is always an exciting time for Mr J and I. As part of a volunteer group we begin the daily 4 kms beach patrols in search of the endangered Loggerhead Turtles nest. Our duties are shared and continue until the end of October, by when the last little hatchling has got to the sea.

Remembering our first nest patrol back in 2010, up at 5am, on the beach at 6am, camera at the ready for what we hoped would be our first discovery of a turtles nest. And there she was in all her glory, the morning sun, rising up above the Mediterranean, forgotten in all the excitement.

The sight of the sunrise was just one of the many joys we were about to experience during our first season as volunteers for the Greek Sea Turtle Protection Society “Archelon”

Archelon has been protecting turtles in Crete since 1989, having first been established in 1977 after discovering that many Loggerhead Turtles nested along the beaches of Zakynthos, by 1989 research had shown that Crete was also  a popular nesting area, particularly along the North Coast, and so the task began to provide as secure an environment as possible for the turtles of Crete.

And as long as there are volunteers, so it shall continue.


Courgette and poppyseed muffins.

Grown in abundance and easier than you imagined, courgettes can sometime become the victim of their own success. All too often forgotten amongst their magnificent leaves doomed to become the monster in the veg patch, the yummy little darlings soon outstay their welcome. It’s not surprising that, after your 20th kilo, treacherous thoughts  of  “how else can I eat them” begin to manifest.

Throughout the Summer I’ve been asked by many visitors, family and guests alike for the recipe to my courgette and poppyseed cake/muffins, so here it is at last.

You will need:

  1. 230 gr plain flour
  2. 1/4 tsp baking powder
  3. 2 tsp bicarb of soda
  4. 1 tsp salt
  5. 4 tsp lemon juice
  6. 2 tbls poppy seeds
  7. 250 ml (1 cup) olive oil
  8. 280 gr sugar
  9. 3 eggs
  10. 2/3 cups grated courgette

Mix ingredients 1,2,3 and 4 in bowl no 1.

Mix ingredients 5,6,7 and 8 in a separate bowl no 2.

Mix ingredient 9 and 10 in another bowl no 3

ADD bowl 3 to bowl 2 and then slowly mix into bowl 1.

The mixture should become more loose and wet as you mix it, this is the courgette releasing it’s liquid as you mix.

When you have a nice shinny, loose mixture, pour into a cake tin or muffin molds.

Bake at 160c for 30-50 mins, the muffins will take less time than the cake so check after 30 minutes. The best way to check if your cake/muffins are ready is to insert a knife into the centre and if it comes out clean then it’s ready, be sure not to over cook it though.

The cake/muffins will need to rest after baking, store in an airtight container and they become even more moist every day. You can alter this recipe to suit yourself, less oil for a drier cake or you can add walnuts if you like.

I always bake with olive oil as we produce our own organic extra virgin,  of course it’s far healthier than butter or margarine and makes very moist cakes and muffins, but that’s easy for me to say with over a 100 ltrs in the basement.

Enjoy!

I must take this opportunity to recommend this book to the novice Mediterranean vegetable gardeners, like myself who are finding it difficult to source a well presented and complete guide to growing a kitchen garden  in this wonderful climate.

This is the first book of it’s kind I have found in English and though I only received it yesterday, after a long 6 month wait for publishing and delivery, I have devoured it’s contents like a pig who has found it’s first truffle.

It is without doubt the most comprehensive guide I have ever come across and the translation from it’s Spanish origins is clear and uncomplicated.

You will find it listed in my books on the Amazon link opposite. Enjoy.

EOT – licence to let.


The view from Arete

Do you really need an EOT Licence?      

According to the Greek National Tourist Organisation, know in Greece as EOT (Elliniko Organismo Tourismo) if you rent your Greek property for holiday use, i.e. not long-term rental of over 3 months, then you must by law have an EOT licence. So if you take money from anyone, that includes family, friends or third parties, the answer is simply YES, you do need an EOT licence.      

Back in 2002, when we bought our land here in Crete, we were told, unofficially, that “No” we didn’t need one. “You only have two apartments”, “No one will know”, “Just tell them it’s your family visiting” And yes we could have been forgiven for taking this advice, it’s a big deal building a home abroad, and didn’t we already have enough paperwork to do without the bother of yet more red tape to unravel?    But let’s be honest, when they do eventually catch up with you, I don’t think that Well…… Kostas in the Kafeneon told us we didn’t need one will wash, do you?      

The process of obtaining a licence is long, complicated and expensive. It requires the services of an architect or civil engineer and above all else, a good understanding of the Greek language. After great consideration, we choose to employ an agent, Gianna Peteraki in Hania. Having always tried to do all work ourselves to save money, we resigned ourselves to the fact that, this time it was not possible and to successfully obtain our licence we had to seek professional help.     

We discovered Gianna through the Greek grapevine, she came highly recommended and we soon discovered that the recommendations were well deserved. It is important, at this point, to remember that all applications are different. In our case, we have two self-catering apartments on the first floor of our house. We live here permanently and both apartments are accessed independently of the house.      

The EOT rules for Villa rental and Apartment rental are different, but as a general rule of thumb, all the points I am about to cover are relevant to most applications, however, please remember that the following information is based on our own experience and the rules are changing constantly, what was relevant to us 2 years ago may not be in force now. Something you need to consider before going any further and probably most importantly, is that the building must correspond exactly to the plans.      

To begin the process we had to submit our application, when the application was approved we were given a protocol number, with this number we could proceed with obtaining the various certificates needed. They are as follows…..    

Fire Certificate – A separate set of plans were drawn up which included the exact location of all fire extinguishers, emergency lights and exit signs in the public areas plus the sprinkler system and fire door required for our boiler room. The plans submitted and approved, we then employed a registered, fire safety engineer, to install the equipment. Then we had to apply again to the Fire Department to come and inspect the equipment and awaited their approval.        

Health Certificate – Again another set of plans were sent for approval to the Health Department, identifying the entire sewerage system and sewerage tank. These were approved and an on site inspection was carried out.     

Tax Certificate – Proving that we owed no taxes.        

Authorised passport certificate – Obtained from our lawyer.      

Deposit receipts from two Banks and the Tax Office, into which we had to pay several small deposits.        

Pool Operating Certificate – if you have one, we don’t.     

Finally, we had to set up the business with our accountant.        

Now the fun begins, after all of the above, we then had to add up our points.    

The basic tourist establishment here in Greece is rated on a key system, rather like the star system. We were applying for the basic 3 key licence. Keys are awarded according to the amount of points your property has. For 3 keys we needed 5001-7500 points. Points are awarded according to the type of accommodation you have and for certain services and or equipment you offer. For example, air conditioning is worth 840 points, a reception area is worth 600 points, parking is worth 160 points, an armchair, a desk, a kettle and other such items are worth anything between 50 to 200 points. Only when you have completed all of the above and accumulated all the necessary points do you apply for the final inspection by EOT inspectors.       

The inspectors visit is of utmost importance, ultimately they have the power to award you the licence and regardless of the above, if they are not happy with anything, your application can be in jeopardy. After all the work we had done to get to the inspection stage, needless to say we were very polite, accommodating and I even baked a cake and to our great relief the inspection went well and we were awarded the EOT license.     

The license is valid indefinitely but you must be aware of the necessary annual up keep of the Fire certificate, The Health Certificate and the EOT price list, which you must pay for at the beginning of every season. The price list is a certification of the minimum and maximum cost you can charge your customers. And of course as a business you must submit an annual tax return and pay the taxes according to your accommodation, for which you will need the services of your accountant.        

Is it worth it? For us yes, ok it’s a long and daunting task and there were many occasions when we felt like throwing in the towel. But once obtained the licence is an invaluable tool, not only to ensure that you are operating within the law, therefore,  giving you peace of mind, but it may even contribute to the value of your home.

Papoutsakia.

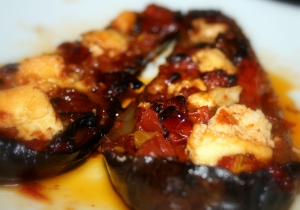
Fancy footwear for dinner tonight? In this post I am going to cover one of my favorite aubergine dishes, Papoutsakia (παπουτσάκια).
But lets start with a little appertizer of history with a side dressing of Greek. 
Papoutsakia

Papoutsakia

The French call them “aubergine” which comes from Arabic, the Americans call them “egg-plant” because the small white ones resemble eggs and  the Greeks call them melitzana (μελιτζάνα) pronounced “meh-lee-tzah-nah”, which apparently comes from the Latin “mala-insane” meaning “apple of madness”. Why such a peculiar name ? Because we’re mad for them. No, because they are part of the nightshade family and were once thought to be very dangerous and yes, we’re mad for them. 

There are so many recipes that include this wonderfull vegetable, which is actually classed as a berry becasue of the seeds inside, but here’s my favourite.

Please remember these are my adapted versions of  traditional recipes made to suit my own taste and garden or cupboard content.

Papoutsakia simply means little shoes, because they look like little shoes, no analysis required there.

 Ingredients.

 2 melitzanes, cut lengthwise and the pulp removed and chopped for adding to the sauce.

2 onions, chopped finely.

2 garlic cloves, chopped.

2  large ripe tomatoes, chopped, or if you don’t have fresh toms then use tinned, my rule of measure is 1 large tomato for each melitzana, so that would equate to 1 tin for 2 melitzanes, or thereabouts!

a bunch of  fresh parsley, chopped.

salt and pepper to taste.

oliveoil, as much or as little as you like.

and finally the cheese, I use whatever I have in the fridge in the following ways:

 you can use either Feta crumbled on top or big chunks of it placed into the shoe before you put the sauce on top

or

any hard cheese grated on top or again a big chunk in the middle….. whatever you want.

Heat the oliveoil in a pan and add the onions and garlic, plus the chopped pulp from the aubergine and saute for 5 minutes……..

Add the tomatoes, herbs and seasoning and gently cook for a further 5 minutes…..

Pre-heat your oven to 180c…….

Place your shoes into a tin, dish or whatever ovenwear you want to use, skin side down.

Now depending on the cheese option you took either place your chunk of cheese into the shoes and then fill them with the tomatoe sauce, cook for 20 minutes

or

If you’ve gone for the cheese on top option, just put the tomatoe sauce straight into the empty shoes, cook for 15 minutes and add your cheese on top for the last 5 minutes. 

Alternatives.

You can add minced beef or lamb to your sauce, just pop it into the pan and fry with the onions and garlic, or you can make a bechemel sauce to put on top with a sprinkle of grated cheese or crumbled Feta. Just remember to give the shoes an extra 10 minutes overall cooking time to allow for the extra ingredients.


Homegrown Salad

SALADMr J and I do love our food, our favourite saying is that whilst some people eat to live, we live to eat.
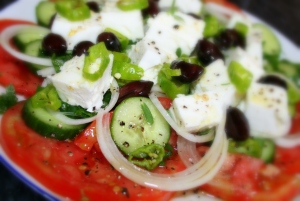
Over the past few years we’ve developed a habit, which to others might seem slightly annoying, of analysing what’s on the plate at every mealtime.

Take for example this beautiful salad, prepared and eaten within half an hour of being picked from our garden. Fresh and delicious, everything except the Feta, though it is local, is our own. Not such a great feat I hear you say, it’s the standard tomato, cucumber, pepper and onion combo, but trying to be self sufficient doesn’t just mean growing veg, it’s the little details that really make the difference.

The extra virgin olive oil, lavishingly poured on top is ours, picked by our own hands from our trees and processed in the village. The purslane and parsley are fresh from the herb patch, the dried oregano was picked from the mountains by Mr J, dried and stored by myself. The black olives are from our eating olive tree,  cured and preserved in a dark, rich, red wine vinegar which I also make myself. 

I’m proud of the fact that we can claim ownership of the majority of ingredients in nearly all our daily meals. And what we can’t provide ourselves we buy locally, the red wine we drink is bought from our neighbour, the bread we eat is from the local bakery and even the sea salt we use is local.

I’d say it’s pretty impossible to be 100% self-sufficient and we’ll probably never get there, but it’s greatly rewarding trying.

Tomatoes.

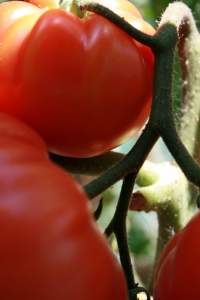
toms1Growing tomatoes organically in Crete has been more of challenge than I had anticipated, but this year, being my third growing season, I have produced the best to date.  I admit I was totally sucked in by the frequent blasé comments of   ” They’re easy to grow here, plenty of sunshine” or ” Just throw them in with plenty of Goat manure” and the most famous of all  ” No, I never use chemicals”. 
OK they do love the sun but need protection from shoulder burn when it’s too hot, yes goat manure is good but whilst it gives you plenty of nitrogen resulting in lots of lovely healthy leaf, it won’t give the plant other ingredients for the flower and the fruits.   And the chemical thing ? Your guess is as good as mine, but I was somewhat enlightened, whilst visiting a neighbour some time ago, when I was briskly shoved into the kitchen and observed the windows and doors being quickly closed because the toms were being sprayed. No problem, everybody does things differently, but when I was handed a beautiful tomato by the same neighbour a few weeks later who proudly announced ” No chemicals” I realised that not everyone’s idea of organic included pesticides but just the fertilizer, yes you guessed it, Baaaa!

I have had many failures over the past three years but basic trial and error and  ” I wonder what this will do” experiments resulted in this years bumper crop.  This is what I did…..

Firstly, with Mr J’s help we constructed six 1 mtr by 1.5 mtr raised beds, or boxes as we call them. They were placed in the most troublesome part of our veg garden, the part where even a famous brand of beer cannot reach. Poor soil, poor drainage and just plain simple bad location where we reaped little reward for our hard graft. 

The soil was rotavated and the boxes palced on top, then filled with a mixture of 1 bag compost from our heap, 1 bag of manure and dressed with a good top soil from around our land.

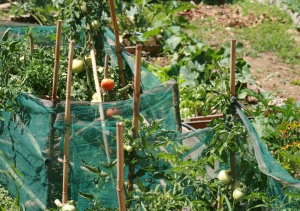
I then constructed a bamboo frame to support the anticipated weight of the tomatoes, planted four plants in each box and surrounded the whole frame with a green mesh, helps to keep the bugs off.  Not forgetting to place the water pipes appropriately in the box.

 tombox

At this same time I started the process of making my own liquid fertilizer. I make two kinds, one from the weeds I pick in the garden and one from our Chicken poo. I call them Green Tea and CPTea, respectfully. It’s a very simple but effective method, yes they both stink but the toms love ’em. Fill a large bucket or any container half with the weeds or a quarter if using the poo as this is strong stuff and then water to the top, leave stand for about 4-6 days and then water the toms with the liquid. Discard the mulch that’s left by either digging it into an empty patch of soil, making sure it’s completely covered or the weeds will sprout and the poo will smell, alternatively just throw it onto the compost heap.

Next I make up a bottle of pesticide spray. Use an empty bottle, drop in a few cloves of garlic, a couple of chillies and a few shavings of olive oil soap or a drop of washing up liquid. Leave stand for a week or more and finally, decant into a spray bottle. This works in three ways, the smell of the garlic puts off some pests, the taste of the chillies puts off others that are not bothered by the garlic and the soap clogs up the insects pores and eventually kills them. You can use this spray on any plants, not just toms, I also use it on my hibiscus which the aphids love to inhabit. But be very careful with the soap as this will also kill your plant if you make the mixture too strong, only a squeeze of the washing up liquid or a few shavings of soap using a potato peeler, when you shake up the mixture before use you’ll see the bubbles. To be on the safe side, before you go spraying everything, I advise you to do a test spray on a leaf and wait a few days, if it looks healthy then crack on, if it shows any signs of blackening or distress then water down your mixture and test it again until your happy with the results.

I wait until the first blossom set before I administer the tea and of course only use the spray if and when needed, be vigilant, a few pests found early and  squashed with your fingers will halt a mass invasion that warrants the spray.

Finally I sprinkle a teaspoon of Epsom Salts, delivered by kind guests from the UK on a visit, again at the first blossom set and then every 3-4 weeks thereafter. Epsom Salts is magnesium and it helps my toms to grow better. I did do a test and the plants with it have stronger stems whilst the ones without are weaker. I also use it on my pepper plants.

Don’t forget to trim any unnecessary leaf stems and nip out the top when your plants have reached the desired height, this helps the plant to become sturdier rather than taller and gangly. Be careful when trimming leaf stems not to trim out too many as the fruits need the leaf to protect them from the sun and only trim the stems that have no blossoms.

Sounds like a lot of work but it’s worth it.